среда, 30 августа 2017 г.

Snacker Day Saturday: 3/31

Squash and I go way back.

We first met under a true-blue North Carolina sky while I was learning the ropes of gardening at my grandparents’ house. They always have an abundant garden and one of my favorite things about summertime when growing up was spending a week squatting on my knees pickin’ beans, eating fresh tomatoes between slices of white bread, and baking zucchini slices with parmesan cheese sprinkled on top. I also had a tendency to get distracted from my bean-washing duties in the driveway making mini obstacle courses for baby toads out of old seedling containers, but that’s a different story. There’s really nothing better than hauling a huge bucket of green beans from the garden that you’ve picked yourself and then eating them for dinner that night.

The only problem with having access to so many fresh, backyard-grown veggies?
Vegetables from the grocery store never taste as good.

Still, I love my veggies and since I currently live in a place where I can’t grow my own in the backyard, I buy my veggies from the co-op or from farmers markets when I can. And the other day while I was shopping, a beautiful, yellow squash caught my eye. I think it might be the bright, sunshine-y weather that’s bringing me back to summer days, and I started craving a delicious vegetable concoction of some sort.

Combine a delicious yellow summer squash with a need for a crunchy snack and what do you get?

A snack that will squash all of your expectations.

Here’s my recipe for squash chips. The process may take a while and the chips will be gone faster than you can say “little toad obstacle course”, but it’s totally worth it to make them. They’re that good.

Oven-baked Squash Chips

Ingredients

1 yellow squash

Salt

Other seasonings of choice (I used an Italian blend on this batch, but I feel like you could make some great new variations on the chips – cheesy squash chips? Chipotle rubbed squash chips? Garlic squash chips?)

How To

1. Using either a mandolin or a knife, slice the squash as thin as you can. This is the hardest and most important step of making these chips so take your time. I cut them with a knife and although difficult, they turned out perfect.

2. Spray a cookie sheet (or two) liberally with cooking spray. Then line the squash slices up on the cookie sheets, ensuring that they don’t touch (they can be really close to each other, but not touching). Preheat the oven to 200 degrees.

3. Sprinkle salt over the squash slices. BE CAREFUL during this step – the chips will shrink and you don’t want to bite into a squash chip that tastes like ocean water. At this point, sprinkle whatever else you want on the chips right now too.

4. Put the cookie sheets into the oven. Let the squash chips bake for 2-3 hours (check them at 2 hours and see how long they need from there). The longer you bake them the crunchier they will be. Patience pays off in this recipe!

5. Take the chips out of the oven and try not to shove them all in your mouth at once. In fact, to keep you preoccupied while you’re snackin’ on squash chips, here’s a little bit of reading to keep you busy.

There’s a story called “True Trash” by Margaret Atwood from her collection titled Wilderness Tips that I think would be perfect for today. Set at a summer camp, this story comes equipped with docks for laying out, sunny weather, and a cool lake for swimming. And drama. Lots of suspense, intriguing interactions between campers and counselors and the female waitresses that make up a small but important chunk of the camp population. If the weather and the squash chips aren’t bringing you towards summer then this story will.

Whatever you do today, whether it’s getting outside for a walk or to mow the lawn or relax with a book, I hope you make these squash chips and thoroughly enjoy your Saturday!

Original article and pictures take http://digintobooks.wordpress.com/2012/03/31/snacker-day-saturday-331/ site

вторник, 29 августа 2017 г.

Kale Pasta Salad

Breads
Breakfast
Cooking Videos
Cowboy Food
Cowgirl Food
Desserts
Freezer Food
Holidays
Main Courses
Salads
Sides
Slow Cooker
Soups
DSC_3345

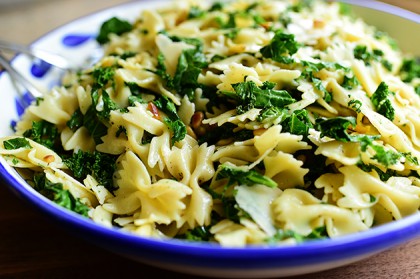
I made this fresh-and-lovely pasta salad to go with the Oven BBQ Chicken Thighs I made Sunday, and I’ve been enjoying it all the live-long week. Not to be clichéd or anything, but I’m a huge lover of kale…and it happens to be totally delicious tossed around with bowtie pasta and some simple, scrumptious flavors. And the great thing about this dish it is, it’s great as a cold salad…but it’s also delicious heated up in a bowl and served warm. I’m planning on whipping up some more on the Fourth, when approximately nine million people will arrive at my house to eat and watch my husband and his brother blow up the skies over Osage County.

You’ll love this!

Kale Pasta Salad

Start by bawling (also known as “boiling”) a pound of bowtie pasta. You can use whatever shape of pasta you want, of course, but I love bowties in pasta salad. Deliciousness gets trapped in the little crinkles and crevices, and it makes life even more worth living than it already is.

Kale Pasta Salad

Cook the pasta according to package directions, rinse it well with cold water to cool it down, then set it aside.

Kale Pasta Salad

Meanwhile, add some pine nuts to a small skillet over low heat…

Kale Pasta Salad

And cook them, tossing them around occasionally, for about 8 to 10 minutes, or until they’re nice and toasted. Set these aside, too!

Kale Pasta Salad
Now, mince up a bunch of garlic…
Kale Pasta Salad
Pour a good amount of olive oil into a skillet…
Kale Pasta Salad
Then add the garlic and turn the heat on low.
Kale Pasta Salad

Even though the heat’s on low, eventually the oil will heat enough to start sizzling the garlic. So when this happens, keep an eye on it so it doesn’t get too brown! Just stir it around and let the garlic infuse the oil slowly.

Kale Pasta Salad
Now sprinkle in some salt and pepper…
Kale Pasta Salad

Then remove it from the heat and let the mixture sit and cool for a few minutes.

Kale Pasta Salad

Meanwhile, rinse a nice bunch of kale and pull the leaves off the stems.

Kale Pasta Salad
Grab a handful at a time and roll it into a tight bunch…
Kale Pasta Salad
And slice it really thin. Keep going until it’s all sliced up!
Kale Pasta Salad

Now, transfer the pasta to a large mixing bowl and pour the oil all over the top.

Kale Pasta Salad

Let all the garlic, salt, and pepper get in there, too. Utterly delicious!

Kale Pasta Salad
Then just toss it around and let it sit for a few minutes.

(Pssst. You can also add in a little balsamic vinegar at this point if you want a little zip.)

Kale Pasta Salad

Now, without washing the skillet, return it to the stovetop over high heat…

Kale Pasta Salad

And cook the kale, tossing it constantly, until it’s partly wilted, about 3 to 4 minutes.

Kale Pasta Salad

And this is why I love kale more than spinach right now (sorry, spinach.) It holds its crispness, even after it’s cooked for awhile.

Kale Pasta Salad
When the kale is ready, pour it over the pasta…
Kale Pasta Salad

Then add the pine nuts…

Kale Pasta Salad
And toss it until it’s all combined.
Kale Pasta Salad

Make sure it’s not too warm (it shouldn’t be, if the pasta was cool when you started), then shave in a bunch of Parmesan. Then, when you think you’ve shaved in enough Parmesan…go ahead and add a little more!

Then just cover the bowl with plastic wrap and chill it in the fridge for at least a couple of hours.

Kale Pasta Salad

Then serve it in a pretty bowl with whatever else you’re serving on the Fourth.

Kale Pasta Salad

Oh my. This is simple, delicious, and lovely.

Kale Pasta Salad
Like, totally. To the max.
Kale Pasta Salad

And it was delicious–I mean delicious—with the BBQ chicken. The perfect combo!

Here’s the handy dandy printable. Enjoy!

Original article and pictures take http://thepioneerwoman.com/cooking/2014/07/kale-pasta-salad/ site

пятница, 25 августа 2017 г.

Sweating the not so Small Stuff – Vegan Cookie Bars, Plus More July Giveaways

It’s Somer Saturday. It’s been a jarring week with some shock and grief added in, so there has been jam making and baking and yes, still lots of smoothie making. However, I admit I’m a bit of an emotional eater and I needed some real comfort food, so I made these Oatmeal Chocolate Chip Cookie Bars ever so slightly lightened up. And trust me, one was plenty, and you’ll never miss what’s missing.

Slightly Lightened Up Vegan Oatmeal Chocolate Chip Cookie Bars

(cookies in honor of Amanda’s Birthday today! Happy Birthday Amanda!!!)

2 C. White Whole Wheat Flour (for Gluten Free option substitute Bob’s Red Mill Gluten Free Flour)

1 C. Rolled Oats (use certified Gluten Free for GF version)

1/2 C. Raw Sugar

1/2 C. Pure Maple Syrup or Agave

(yes this still seems like a lot of natural sugars, my original pre-vegan go to recipe nearly double the amount)

1/3 C. Coconut Oil (original recipe called for 1 C. butter)

4 T. Almond Butter

1 T. Ground Flax Seed

1/3 C. Almond Milk

2 t. Vanilla

1/2 t. baking soda

1/2 t. baking powder

1/2 C. Vegan Chocolate Chips (original recipe had 2 C.)

Method: Preheat oven to 350 degrees.Combine flour, oats, ground flax, baking soda, baking powder, salt and sugar in a large bowl with a wire whisk. Then, using a pastry cutter, cut in almond butter and coconut oil until crumbly. Add agave, almond milk, vanilla and chocolate chips. Stir til just combined. Press into an 8×8 pan. Bake for 25-30 minutes. Let cool for 10-15 minutes then cut into 16 squares.

Now for the Real Sweaty Bit. Remember my post about Homemade Pit Paste? Well, Christie’s post yesterday at Turning Veganese reminded me that I’m not the only sweaty girl that wants a natural deodorant that stops me from smelling like my brother Abe’s armpits (sorry Abe) and isn’t going to give me alzheimer’s or dementia. Here is the original post and recipe. I’ve been using it for a couple months now and it’s really, really fabulous (except at Ragnar once where I accidentally caught a whiff of myself. However, I was using Erika’s borrowed pit paste, and yes we’re “that” kind of close, and she did mention was missing one of the oils, so I can’t vouch for it).

Since most of you likely have cornstarch, baking soda and the coconut oil needed to make it, Today’s giveaway is a pre-measured essential oil and rosehip blend that you will need for the remainder of the recipe for 3 lucky winners. It will come to you in a cute teeny tiny oil vial, just dump it in your recipe, and voila, Pit Paste!

Rules of Engagement:

1- You must be a follower of this blog, if you don’t know how to do that, there is a “Follow blog via email” button at the top column to the right. This contest is open to US readers only, since the oil vial is glass and may seem a bit questionable to customs officers.

2- You must like this post (click on the title name of this post, then go to the bottom of the post just above comments and push the like button),

3- You must comment below, telling me how you deal with sweating the not so small stuff.

Winner to be announced Saturday July 21st, 2012.

And now for the real moment you’ve all been waiting for.

The winner of the Lululemon Giveaway is: Sydney Kegan!

Winner was selected by using the random.org service. Please email your mailing address to me at goodcleanfoodblog@gmail.com and I will mail you your prize!

I’m going to suit up in some Lulu gear myself to pound the not so small stuff onto a trail and leave it all behind.

See ya on Tasty Tuesday!

Original article and pictures take http://goodcleanfood.wordpress.com/2012/07/14/sweating-the-not-so-small-stuff-vegan-cookie-bars-plus-more-july-giveaways/ site

среда, 23 августа 2017 г.

Bahama Mama

Cool ocean breezes, warm sand between your toes, and a refreshing Bahama Mama cocktail served with a cute little umbrella. Ahhhh, now that is where I would like to be right now. I would much rather watch little kids build sandcastles, than start the daunting task of packing up my house!! But first…..

You can almost feel the ocean breeze while enjoying this refreshing Bahama Mama | cookingwithcurls.com

we go back to dream land. I know, I know, the house won’t sort and pack it’s self…..oh how I wish it would. Sixteen years ago this week a moving company packed up my belonging and I left California for a new adventure in Iowa…..that turned into a nightmare. That’s how Rockwell-Collins traps it’s employees. They pay to move you to the middle of nowhere, but there isn’t anyone willing to pay to move you back!! You have now entered the Twilight Zone!

I will not be returning to California, but I will be leaving Iowa filled with excitement for the next chapter of my life…..a new beginning on my terms, and drinks with cute little umbrellas…..

Bahama Mama | cookingwithcurls.com

Oooh, and maybe even some cute cabana boys to deliver them…..a girl can dream. And yes, even my drinks wear flip flops!

How to make a Bahama Mama cocktail:

Fill cocktail shaker with ice. Add the light rum, dark rum, coconut rum, 151, orange juice and pineapple juice…..

Bahama Mama shaker cookingwithcurls.com

Shake to combine. Strain drink into an ice filled glass, and top off with grenadine…..

Bahama Mama grenadine cookingwithcurls.com

Add a straw and give the ice a quick shake. Garnish with orange slice/wedge, maraschino cherry, and cute paper umbrella…..

Bahama Mama :: you're on island time now | cookingwithcurls.com

Now sit back, relax, and enjoy a refreshing Bahama Mama, you’re on island time now!! Okay not really, time to get back to work and sort through all of the junk that has collected over the past 16 years. I bet you didn’t know that I am a pack rat, did you? Well now you do.

More tropical cocktail recipes:

For more fun summer cocktails, check out this collection of 15 Refreshing Summer Cocktails.

Enjoy!!

Original article and pictures take http://www.whitelightsonwednesday.com/2014/03/bahama-mama/?utm_source=feedburner&utm_medium=email&utm_campaign=Feed:+WhiteLightsAndEuphoriaOnAWednesday+(White+Lights+on+Wednesday) site

вторник, 22 августа 2017 г.

Back to School Sandwich-less Lunch Ideas

braided-christmas-tree-bread-recipe

Baking something special for the holiday is a real adventure. Sliding through the various recipes you find online, avoid making the same mistakes as other home cooks, and trying to come up with an original product. We already posted a recipe for Nutella-bread and recently a brioche in the shape of a Christmas tree.

1469857_776243065735504_325031061_n

Original article and pictures take http://www.goodshomedesign.com/braided-nutella-christmas-tree-bread-recipe/ site

понедельник, 21 августа 2017 г.

30 Everyday Products You Can Make Instead of Buying at Walmart

30 things you can stop buying at Walmart that you can make at home.

I am in need of Walmart rehab!

Walmart has been my go-to source for my household and pantry needs.

Not only do their superstores carry almost every product I need, but often times their prices can’t be beat.

I got to thinking, there has to be a better way than repetitively purchasing chemical laden products! Right?

I was right! In searching for ways to not only save but to help me break my Walmart addiction, I have found several ways to make my own product at home (better for me and my family)!

And, to boot… the recipes I found are easier on my budget. Who would’ve thought?

In my process of making my household healthier while maintaining my frugal side, I couldn’t believe how many ways I could save by spending a little time creating my own products. And, I want to share with you some of my findings (today’s your lucky day!). Below, you’ll find 30 ways you too can break your buying habits. Enjoy!

Laundry Detergent for $3

products you can make instead of buying at walmart

DIY Brownie Mix

Apple Vinegar from Scratch

everyday items to make instead of buying from walmart

From 17apart.com

Homemade Hamburger Helper

everyday products you can make instead of buying at walmart

Make Your Own Peanut Butter

everyday products you can make instead of buying at walmart

Homemade Natural Makeup

everyday products you can make instead of buying at walmart

Easy Cinnamon Rolls from Scratch

everyday products you can make instead of buying at walmart

Homemade Bug Repellent

everyday products you can make instead of buying at walmart

DIY Cough Syrup

everyday products you can make instead of buying at walmart

Vicks Vapo Rub Recipe

everyday products you can buy instead of buying at walmart

DIY Carpet Powder

everyday products you can make instead of buying at walmart

Vanilla Lip Balm

everyday products you can make instead of buying at walmart

Homemade Bisquick

bisquick substitute

Homemade Ranch Dressing

everyday products you can make instead of buying at walmart

DIY Dry Shampoo

everyday products you can make instead of buying at walmart

Homemade Macaroni and Cheese

everyday products you can make instead of buying at walmart

Homemade Toothpaste

everyday products to make instead of buying at walmart

DIY Gummy Bears

everyday products you can make instead of buying at walmart

From undressedskelton.tumblr.com

Ginger Ale from Scratch

everyday products to make instead of buying at walmart

Jewelry Cleaner

everyday products you can make instead of buying at walmart

From food.com

Homemade Cheez-Its

everyday products you can make instead of buying at walmart

Homemade Mozzarella

everyday products you can make instead of buying from walmart

From thekitchn.com

Easy Homemade Maple Syrup

everyday products you can make instead of buying at walmart

Homemade Cleansing Wipes

everyday products you can make instead of buying at walmart

Homemade Barbecue Sauce

everyday products you can make instead of buying at walmart

Sunflower & Mason Jar Centerpiece

everyday products you can make instead of buying at walmart

Homemade Body Wash

everyday products you can make instead of buying at walmart

Chocolate Pudding from Scratch

everyday product you can make instead of buying at walmart

Homemade Pickles

every day products you can make instead of buying at walmart

Homemade Potato Chips

everyday products you can make instead of buying at walmart

We have some creative and frugal readers…
Share with us Your DIY recipe below!

Tips to put more money in your pocket & Biblical principles on managing it well.

Just click to take our FREE E-course to get 5 simple lessons to help you improve your financial life today!

Better manage your money, pay off debt, save more, using key Biblical principles!

Advertising Disclaimer: The pages on this site help us pay the bills by using affiliate relationships with Amazon, Google, Ebay and others but our opinions are NEVER for sale. Find out more here.

Original article and pictures take http://christianpf.com/products-you-can-make/ site

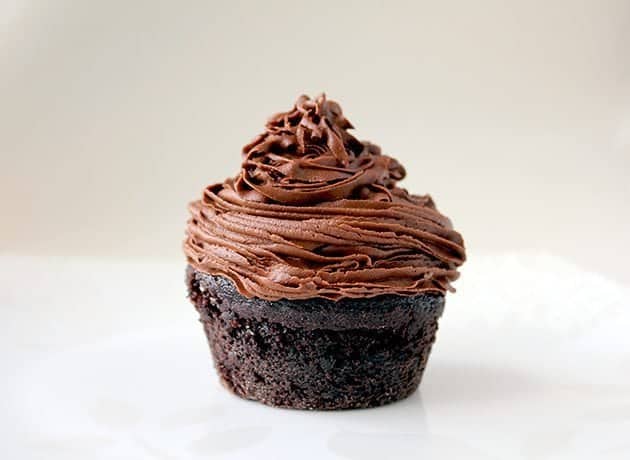
Chocolate Buttercream Frosting Recipe

This truly is the best chocolate buttercream frosting recipe ever. You’ll have to read on to see my secrets! I can’t believe that it’s tak...